This scanned manual is well done in that most all the pages except for one is straight and clear- the way I would do them. One page was upside down but that happens. For the money that is charged on this site you get a pretty good deal. Now with complex repairs, I still prefer to us paper manuals which I have to buy at stereomanuals but the one I got here was much less than the $45 he was charging but this is a larger than normal manual for three different units. I am a picky manual user because I have used original manuals from Sony and Teac.
Content A4 and A3 format pages. Exactly what I needed to restore my old receiver.
Text excerpt from page 72 (click to view)
CHAPTER 4 DISASSEMBLY/ASSEMBLY
5.7.2 Motherboard CPU
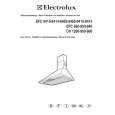
The CPU chip on the motherboard is installed in a socket (see F04-506-01 on page 4-20). The socket that holds the CPU on the motherboard is a Zero Insertion Force (ZIF) socket that allows the chip to be removed. Pin 1 on the ZIF socket is denoted by an angled corner. a. To Replace the CPU 1. Remove the CPU fan and heatsink as described in �To remove the CPU fan and heatsink� on page 4-32. 2. Lift the lever to release the CPU from the socket (see F04-507-03).
CPU Lever
Pin 1(angled corner on socket)
ZIF socket
F04-507-03 Removing the CPU 3. Grasp the edges of the CPU and gently pull it out of the socket. 4. Insert the new CPU so that the notch on the chip lines up with the notch area on the socket. Pin 1 on the CPU is denoted by an angled corner. The angled corner should point to the small 1 printed on the board directly below the CPU socket. 5. Push down the socket lever to secure the CPU. 6. Replace the CPU fan and heatsink as described in �To replace the CPU fan� on page 432.